Dark woods and a wild wolf Karise…..

a fairy tale red....

Sometimes what you’re reading starts to inspire you in secret ways, certain foods eaten within the pages can change your dinner plans, and clothes and colours can influence your wardrobe… this was very much the case last April…about halfway through reading this book by Alice Hoffman (along with Angela Carter she’s one of my favourite writers) I started remembering a shawl, the deepest darkest red, the hue of Powell and Pressburger’s red shoes and as dangerous as Sister Ruth’s lipstick…. Ever since I first saw The Company of Wolves I’ve wanted a red cape like Rosaleen’s and as I read more and more of the book, in the shadows of my imagination I began to picture, instead of a cape, a shawl… Quite by chance I then saw a photo of this deepest, darkest red dyed by The Countess Ablaze …. It’s 100% wool and the breed is North Ronaldsay…

When I first learnt about these little sheep and their seaweed eating ways, they made me think of something Angela Carter would write about in her stories, something slightly off kilter, unusual, a magical animal from a Brother’s Grimm Folk Tale that you could imagine talking or having special powers…

the lace pattern is growing

With no real pattern in mind I just ordered two skeins of the yarn, it’s a laceweight (with 500 metres per skein) so I knew two skeins would be enough to knit something nice and floaty but I didn’t really have any exact pattern in mind…. but as is the way when you’re knitting, your mind can wander off, think about other things, and little connections from here and there begin to join up…

There are two shawls I’ve now knit more than any other, Ishbel by Ysolda Teague and Karise by Karie Westermann…Both of these are delicate, elegant and beautiful, and are rarely ever off my knitting needles…

The patterns are charted and I kept looking back at them and began a wondering what if….could I….perhaps combine them… so with a big notepad of graph paper (and lots of glue and tape to make the sheets of paper even wider) I began to first draw out the shaping for Ishbel, and then began to plot down the lace pattern for Karise… there’s a bit of a difference between the two, mainly that Ishbel has increases on the purl side edging as well as the front so that it widens out more than it drops and deepens.

To double check that what I was doing would work, as well as drawing up the chart, I also found it really helpful to knit up a really small version of the shawl so I could check what I needed to do at the sides so that the pattern would work with the extra increases at the back…I just used some old Rowan yarn that had been in my stash for ages, I think it’s a dk but it’s nice in that I could see exactly what my stitches were doing and where the pattern had to change

the shawl inspector

I’ve mentioned Bernard’s love for the warm and woolsome before and this yarn was no exception, pretty much from the start he’d find a way to have a little forty winks on it, even going so far as to scoop it out of whatever knitting bag it was in…. I never have the heart to move him though so just let him decide for himself when he’d napped enough….

This was defintely one of the advantages of using such a nice woolly yarn, any slight paddy paw plucking was easily stretched and pulled back into place without any upsets.

frothy stitches

It’s probably not so easy to see in this picture, but the cleverness and beauty of Karie’s lace pattern for the Karise is that it starts off quite solid and then shifts to open up and become more etheral… She has told me that the name of the pattern was inspired by Karise in Denmark that has a Fairy Hill and I certainly can imagine some fae sprite wearing one of these to keep warm in the Winter….

The North Ronaldsay yarn was a perfect choice as its really nice and woolly, what I think of as a sheepy yarn, and it’s proper crisp so that the stitch definiton is excellent, which makes it easier to read your stitches when you’re knitting… this pattern always looks best when it’s knit in a proper wool yarn that holds it’s stitches…

Wider knit KariseSo this is my tah dah moment…. I’m really pleased with how this has come out, as you can see it’s certainly a nice large shawl… size wise it’s 108 by 39 inches (274 x 100 cm) but it’s as light as light and still wonderfully warm without being all too much and suffocating feeling….(which is quite handy as I started my hot flushes just before Christmas so my clothes are currently doing a hokey kokey, on and off, on and off again…this though is just perfect, not too heavy and enough to keep the chills away)…

I actually finished the shawl back in September and have worn it a fare bit but suddenly realized I’d not photographed it so the points are looking a little less than eye pokey to when I first un-pinned it, and the edges have rolled in rather, but I think it still looks pretty good.wrapped up warmEven though it is big, I think it’s still nice and wearable as I can really wrap myself up in it, (if you ever watched Larkrise to Candleford then you can picture me wearing this like Laura’s mum wore her house haps….. there is a little bit of a tickle with the yarn, it’s quite dry and shuffley between my fingers so it might not be the most suitable to wear under your chin if you are more sensitive, but if you don’t mind a yarn that’s a bit wild and frolicsome then this is ideal.Back detail
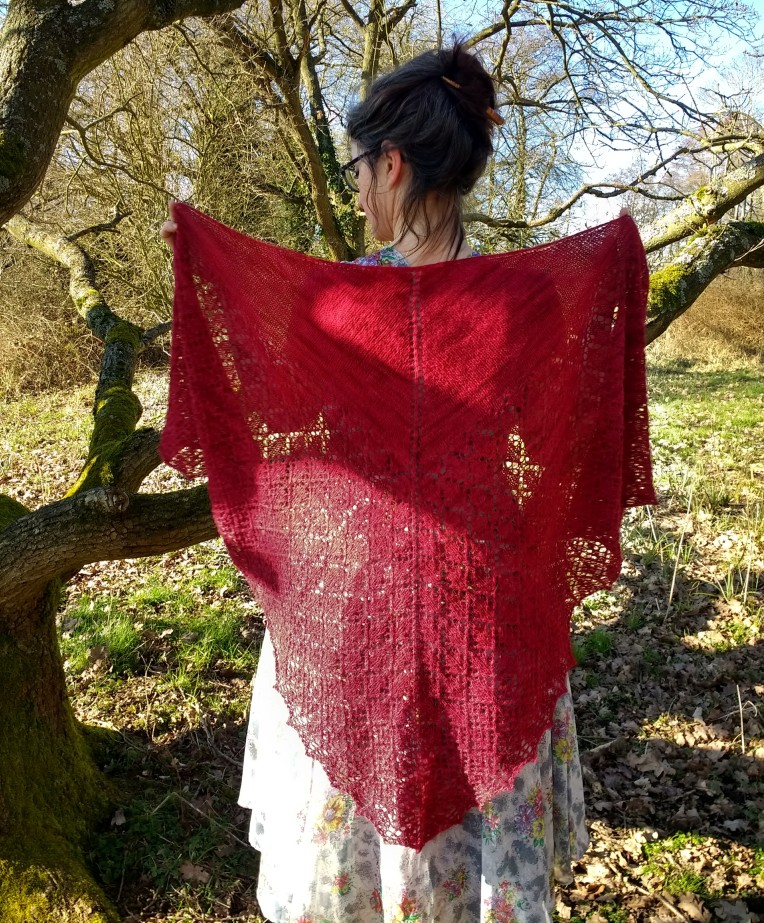
I like this picture because you can get a nice idea of the central triangle that is worked in stocking stitch, how the yarn is dyed is beyond me, somehow The Countess has conjurred up shadows and what I think of as lipstick smudges and this all looks dappled when the yarn is knitted up…

Because I knew this was going to knit up on the roomier side of things I increased my initial stitch count to 195 stitches before working the lace pattern,  because of how the increases on the purl side shift things, the pattern is worked over 16 rows… I really enjoyed playing around with the maths and feel so happy to have joined together my two favourite shawl patterns, and if you’d like to read more notes and calculations then you can find them on my ravelry project page… very special thank yous to both Ysolda and Karie for writing lovely to follow patterns with clear charts which helped me no end, and to always awesome Lindsay (The Countess) for dyeing yarn that just looks so delicious.

Deep red KariseAt the start of the year, lovely Louise who does the Knit British Podcast did a big review of North Ronaldsay British Breed yarn, the yarns came from all over England, but were all single breed North Ronaldsay… some of the yarns were quite bitey and crisp, but there were others that were surprisingly soft, these had had the guard hairs removed…this is a link to that episode and I think it’s well worth a listen as the North Ronaldsay is a wonderful and lively little sheep and fantastic to knit with.

The yarn for the shawl is called The Rt Honourable Ronaldsay, it’s a laceweight and this colourway is called Deadly As…. sadly this has now been discontinued but you should go check out The Countess Ablaze website as her other yarns are all flipping incredible…. (and just in case you were wondering, I bought the yarn and the patterns myself, this isn’t sponsored or anythng, I just love love love these beautiful patterns and this smashing yarn and I wanted to say nice things about them because I think they are all brilliant.)


No need for a runcible spoon……

slicing-quince-for-jelly

The last of the wildlings are just about ready to fall off the trees, easy to see now that the branches are half bare and the fruit has turned golden yellow…one of my favourite breakfast jams (well more of a jelly along the lines of a wobbly, peel-less marmalade) to make is Quince and Wildling jelly….this isn’t the true quince as eaten off a runcible spoon by the owl and the pussycat, but the smaller fruiting Japonica quince (Chaenomeles)….I noticed one growing up up the road and round the corner a ways a few years ago and decided to pick some fruit and make a jelly…the results were very good as the fruit contains plenty of pectin and also takes on other flavours well too….I tend to use it alongside the wildlings as the small quince never harvest very much (though this year I gathered just under 850 grammes) …

I tend to pick the quince before they are fully ripe and then get to enjoy a couple of weeks as they slowly ripen in a huge bowl in our sitting room…the scent is all sherbetty and citrussy and makes me think of Turkish Delight and Arabian Nights….

apples and quinces

The quince need to be simmered a little longer than the apples so I tend to give them a wipe over with a clean damp cloth and then slice them into discs, pop them into a large heavy bottomed pan where they are covered with water and slowly allowed to soften…then the prepared wildlings are tumbled in and simmered…

The golden hued jelly is lovely as a breakfast preserve, it really suits soft brioche rolls and fluffy breakfast buns rather than wholemeal toasts (though feel free to eat it like that if you  prefer)…it also works well to heat and use as a glaze on top of pastries….

quince and wildling jelly

(sometimes I run out of jam jars for the last little bit of jelly so I just put what is left in the pan in a tea cup and keep it in the fridge)

This is a link to my original recipe (I used half a cinnamon quill to add another note of flavour) but this is the version I made this week…..

Golden hued quince and wildling jelly

Ingredients

850 g  Japonica quince

1500 g of wildlings (what we call apples that just grow randomly and whose variety is unknown)

Granulated Sugar (I tend to keep a couple of those huge 2 kilo size bags around for making jelly and jam this time of year)

(allowing the juice to slowly drip I got 1500ml of juice, but then I squeezed the bag and measured out another 350 ml….I could have squeezed more if I had wanted…)

sliced quince

Method….

Wash the japonica quince in cool water, pat dry, and slice into discs….place all the fruit into a large heavy bottomed pan (or a stainless steel jam pan), cover with water (for every 100 g of fruit you need to use 200 ml of water)…on a gentle heat, bring to a slow simmer and allow the fruit to soften…

After about half an hour, wash and wipe over the wildlings and chop into pieces, add the apples to the quince (including the cores) and also some more water…this time for every 100 g of apples I use 75 ml of water….continue to allow the fruit to simmer til the apples become fluffy and “lambswoolly”…..while the apples and quince are cookng you can add a quill of cinnamon or a dried star anise, but this time I added a couple of leaves from my Attar of Roses Pelargonium for a delicate floral note……

Once the fruit has softened, allow to cool…if you like you can break the fruit up even more with a potato masher…once the fruity pulp has fully cooled, pour it into a wet jelly bag (I tend to use an old pillow case that I use only for jam and jelly making)…hang the bag of fruit pulp up so it can slowly drip into a bowl and leave for a good few hours or overnight…

If you don’t squeeze the bag the resulting jelly will be clear and dazzling, but if you aren’t planning on using the jelly for Village Fetes or local shows, then squeeze away as you will be able to make several more jars with the resulting juice, it will still taste as nice but won’t be quite so ooh to look at…..

Measure the juice, for every litre of juice you want to use 1 kilo of granulated sugar…..

At this stage, pop a couple of saucers into the freezer ready to use for a set test…and make sure you have plenty of sterilized jam jars being kept warm….

In a clean jam pan, combine the juice and sugar….slowly heat and allow the sugar to dissolve, keep stirring and then turn up the heat so you get a nice rolling boil….. being wild fruit, a lot more white froth will be produced, it’s best to try and remove as much of this as you can as the froth contains a lot of air and this will prevent the jelly from keeping as well as it should….

Once the fruity syrup has been boiling for about 5 minutes, check for a set…I tend to do this by spooning out a little of the syrupy liquid onto a saucer straight from the freezer…give it a minute or so and then push your finger into it….if it wrinkles then it is ready, if it remains all liquidy then give the jelly another minute or two at the rolling boil and test again but be careful not to overboil….once you get the wrinkle, carefully laddle the jelly syrup into sterilised jars and gently lay on top waxed paper discs, allow to fully  cool before covering with cellophane circles and elastic bands………this is quite a soft set jelly, so it’s lovely and wobbly…..

The resulting colour is a beautiful mellow, golden and honey jelly and is just perfect for slow weekend breakfasts on brioche rolls or fluffy white breakfast buns….


Subtle hues of velvet fudge……

brushwork shade card

A little while ago I was contacted by the lovely Sonja from Blacker Yarns asking me if I’d be at all interested with having a bit of a play with some of their new, birthday celebration yarn….now I know that the past couple of years I’ve written much more about knitting than I have about patchwork or jam making or my slow afternoon strolls out over the marshes and all I can say is you can totally, hands down blame it on people like the good folks at Blacker Yarns….time and time again they’ve created gorgeous yarns that have just made me want to lose myself in the comforting sense of feeling rich, woolsome yarns run between my fingers…. good quality yarns that celebrate the wonderfulness and diversity of British breed sheep have made me want to persevere with my knitting more than anything else..and so, yes, I’ve fallen head over heels in love with knitting….

This year’s birthday blend from Blacker Yarns is called Brushwork and it feels wonderful….firstly when you give the yarn ball a good old hand squidge ( even though I know this is no way to get a true idea of what the yarn will do, it’s very hard not to give it playful squeeze)….  it also feels soft and velvety when it’s running free through your fingers and over your needles….and finally as a piece of fabric where it’s warm comfort and snuggles….

unclocked lace nad cables

(unblocked on 4.5 mm needles)

As with all the special blends by Blacker there’s a lot of hard work and care and thoughtfulness gone into creating not just the yarn base but also in choosing how it was to be dyed (in the wool before it was spun into yarn) and then developing the colours.

blocked cables and lace

(blocked and washed the first time…look at those plump cables)

The yarn is a ‘sport weight’ blend of Scottish Bowmont, Castlemilk Moorit and Aplaca…if you’re aware of your rare breeds than you’ll be familiar with Castlemilk Moorit…I knitted a swatch in this the other year so recognized that delicious fudginess quality straight away….but the yarn is more than just tooth sweet and fudgy…it’s soft and plump, and when knitted there’s a nice robustness to the stitches even when I’d gone up a couple of needle sizes to a 4 and 4.5 mm….mostly I’m used to knitting with what is commonly called a 4ply, I love knitting shawls and a 4ply is an excellent weight for that, but I’ve also knit a couple of shawls in dk and aran …  Sportweight sits somewhere in between the 4ply and dk although personally I find yarn from Blacker Yarns tends to be on the plumper side anyway so it feels more like a podgy dk to me….

cables detail

(blocked… after a third wash)

Blacker Yarns sent me a very generous sized sample so I was able to knit up 3 different swatches…the needle size suggested on the ball band is 3.5 mm (that’s to give 23 stitches over 4 inches ) so I knit one with those, but also knit swatches with 4 and 4.5mm needles (I suppose for a more accurate test I should have knitted all the swatches with the same pattern, but I didn’t as I wanted to see how different textures and stitches would look)….all three swatches look lovely, even after a fortnight of being pinned both to and under my clothes… the swatches have been washed twice and I wasn’t aware of any shrinking…to be honest I can’t even really see any signs of wear and tear…the stitches themselves have perhaps softened off a little, but after that first blocking they stood out and were very well defined…this might be because the colour of the yarn is very matt, there isn’t a lot of lustre but I think that this compliments the overall softness of the palette….


ripples detail

(knitted on 3.5 mm…blocked and washed a second time)


I really enjoy making up little swatches, it’s a nice way to understand the yarn, getting to know it,  say “how do?” and see what stitches it likes, what range of needles can be used for the fabric to still look good…and most importantly, how does it wear when it ‘s handled and worn, rubbed for lengthy periods of time…..how does it look after being washed a few times….

While I was knitting the swatches I started to think about how I would use this yarn if I was to buy some….it’s not crazy million pounds a skein price but at £8.40 for a 50g I know I wouldn’t be able to afford enough to knit a garment…I don’t think this yarn is over priced, and am really happy that it’s available in smaller skeins, but I know what my budget is….so I was more drawn to experimenting with a larger needle to create that extra drape that you want in a shawl…..there’s certainly enough of what I call “Flops a doodle” in the fabric on a 4 or 4.5mm needle, that and I know a dk shawl is ideal on mornings when there’s been a real cold snap….testing out the washed swatches with them pinned under my clothes also proved to me that this is perfect for a fat, stitch bouncy shawl or heavily textured cowl….

ripples

(blocked and washed a third time)

If you wanted to knit a shawl in Brushwork then I think you are going to feel truly wrapped in velvet squish…..you know, I’m sitting here with the swatches (rubbing them on my face while I write, and the texture of the fabric also reminds me of beautiful old chenille…years ago I inherited a gorgeous chenille tablecloth that had been Nanny’s and it was so soft and velvetty….

texture detail

(knitted on 4 mm needles…washed and blocked first time)

Some of the swatches grew larger, although one grew width ways, while the other length ways though I guess this also was in part due to different stitches being used……

While I’ve now seen some lovely examples of how brushwork blends together when worked in various types of colourwork, I really like how it looks used as a single flat colour in lacework or in patterns that create lots of texture…there’s a nice definition created by knitting stitches together or passing them over each other, even after a few washes have softened edges, the subtley of the stitch structure is wonderful and they hold up a surprising amount of touchy feel interest…


diamond detail

(blocked and washed a third time)

Like previous birthday yarns, Brushwork will only be available for a limited period of time, it goes on sale at 8am on the 28th September from Blacker Yarns.

Once again, hugest of thank yous Sonja for letting me play with this gorgeous new velvety softness…and happy happy birthday Blacker Yarns…..

Apologies for the shifting colours, it just happened we’ve had a lot of weather changes so the light has been a bit temperamental…as far as I could tell there was no bleeding out of dye colour or fading….


Dark raspberry truffles inspired by fragrant yarn….


knitting goddess bfl dyed over dark

A couple of months ago I bought two skeins of the most beautiful deep raspberry plum and soft chocolate brown tinged yarn from my favourite of favorites The Knitting Goddess….The yarn was 100% Blue Faced Leicester and looked good enough to eat, like a pudding that slowly melts in the mouth and leaves you with that mmmm feeling….they smelt incredible and the colour was gorgeous, all red wine and after dinner chocolates… at the time I told Joy (The Knitting Goddess herself) that they reminded me of some truffles that I’d made and promised to share the recipe next time I made them….

So my dear Joy, I’m sharing my truffle recipe just for you, to say thank you a thousand times over for creating the most deliciously coloured and blended yarns, and for inspiring me to keep my yarn pantry well stocked…..

dark raspberry truffles

Raspberry on Dark truffles

I’ll be the first to admit that these aren’t the poshest, fanciest looking truffles, but they taste lovely and keep very well in the freezer… in the past I’ve tempered chocolate to coat them to make them look a bit swishier (but it’s a bit pfaffy to do and takes up valuable knitting time so instead I’m suggesting to roll them in a good quality cocoa…also the gleam of tempered chocolate quickly fades in the  freezer which is another reason to just dust them in cocoa instead).. to be honest, I think the whole point of them is that they aren’t dead posh or swishy, more that they just taste nice and if you gift some, people will just be thrilled that you’ve made chocolates for them…..

Ingredients

200 g chocolate….I go for something around 75 %…lindt is very good and I made these with a mix of Waitrose chocolate….but a bar of Galaxy will not cut it I’m afraid as it melts all goopy.

200 ml of double cream (I have made them with Jersey cream…and thought I’d died and gone to heaven…..but regular runny double cream is also fine)

15g butter….salted or unsalted…doesn’t really matter

Home made raspberry or plum jam….. I have tried these with a shop bought jam, they were eatable but not all heart breathy and mmmm….they really are the best with a homemade jam.

Good quality unsweetened cocoa powder…I like Okakao

rapberry jam and chocoalte

Method

First you need to make a thick chocolate ganache for the truffle centre, so break the chocolate into pieces.

Heat some water in a pan, put a large pyrex bowl overtop (you do not want the bowl to touch the water) … pop the chocolate pieces into the bowl and allow to slowly melt….. (a silicon spatula helps wipe all the chocolate from the sides)….. add the butter and melt…

You’ll need a couple of teaspoons of the home made jam…sometimes I sieve it so there are no pips, other times I forget…if you are using a mix of raspberry and plum then you really do need to make sure there are no plum stones in the jam mix…. Stir the jam in and allow it to melt into the chocolate as well….

Turn off the heat….add the cream and whisk the ingredients together so that the ganache thickens up nicely….

Cover with clingfilm and place in the fridge for a couple of hours so that the ganache firms up.

Once the ganache has stiffened, it’s time to make the truffles….(you might want to taste the ganache at this point…cook’s treat xx)

Finely sieve the cocoa powder, you’ll probably need about a couple of tablespoons sieved onto a large plate…..

rolled in cooca powder

With a teaspoon (not a measuring one just a normal one you use to stir tea, coffee etc) scoop out cherry sized amounts of the ganache/truffle mix and pop them onto the cocoa powder…once you have a dozen, gently roll them into balls across the tips of your fingers…(this does get a bit messy so it’s probably best if you have a bowl of soapy warm water ready to wash your hands all waiting rather than cover the taps in sticky chocolate paste)….then roll the truffles around in the cocoa powder and place them on a piece of baking parchment….once a dozen are made, then make a dozen more until the mixture is all used up….this makes a good couple of dozen so keep some in the fridge but you can also freeze them.

Freezing them is super easy…line a baking tin or tray with clingfilm or baking parchment, lay the truffles on there, avoid them touching or they will freeze together, then put them in the freezer overnight…..next day transfer them into a freezer bag or container, it’s fine now if they touch…..and you might treat yourself with a taste of one as they are very nice cold, you’ll get more of a sharp fruity hit of the raspberry/plum taste…..

These are quite rich so probably won’t be popular with children, but adults like them very much indeed….perfect with a nice cup of tea, or glass of a velvety red wine and some woolsome, sheepy scented knitting yarn from Joy….


Kitten soft with a silky lustre….

a rainbow skein

A couple of weeks ago I was lucky enough to be sent a little skein of a new yarn base from Joy who works under the name The Knitting Goddess (I’d just like to say that I think Joy has the most perfect name, seeing her brightly paired hues always makes me smile and feel proper heart happy)….it’s been custom spun for her by the wonderful folk at John Arbon Mill, the base is British Bluefaced Leicester, Wensleydale (which is a lovely lustrous and clotted cream, gold sheened wool), Alpaca and silk….and as you can imagine is wondrously soft…in fact all the wool and alpaca comes from UK flocks, then is processed in the UK and spun in Devon.

I wholly suspect Joy has been at Hogwarts as her colour combinations are so magic, and this colourway was no exception, it’s called Almost a Rainbow and definitely captures all the smiles and oohs of when you look up and there is a rainbow arc in the sky….

winding onto a nostepinne

After a few days of petting and stroking the yarn, and thinking about possible stitches to try out, I began by winding the yarn into a little ball…if you’ve been reading my blog a while you’ll know I used to use the cardboard tube insert from a roll of kitchen paper to do this, well no more…I’ve had an upgrade….(I commissioned local green woodsman Simon Lamb to make me a nostepinne, and as well as making me a regular sized one, he also made me this dear little one which fits into the palm of my hand and is the ideal size for making tiny balls for swatching, it’s made from local Norfolk Yew)…I much prefer to wind my yarn on a nostepinne as it helps me get a real feel for the yarn, it’s a bit like saying “how do” and allows me those few extra minutes of yarn play and feeling the yarn thread through my fingers is always blissful….I could really feel the Wensleydale and silk as I wound the yarn.

knitting swatch

One of the treats for me in learning to knit has been the “joy” in knitting little swatches like this, I don’t have the same knitting experience as I do with sewing or quilting so these are an excellent way to find how a yarn knits up, how different stitches suit it, but also and most importantly, how does it wear…I’m not a particularly speedy knitter so if I’m going to spend hours upon hours knitting a shawl or socks or a cardigan then I want to know that the yarn will suit the purpose…..at the moment I like knitting shawls so thought I’d knit this swatch using a 4mm needle which is quite a big needle for a 4ply yarn, but that helps create a nice drape which is what you want when you knit something to fling around your shoulders…..as you can see, even unblocked the stitches look nice and well defined….

I particularly love how clean and bright the colours are, no muddiness going on, and the fabric that the yarn makes is proper kitten tummy soft….there is a real lustre and lusciousness to the fabric, it’s the sort of knitting that you want to keep laying against your cheek to go “oooh”….

unblocked swatch

I tried to use a couple of texture stitches as well, and while I’m not particularly confident yet to try any brioche knitting I can imagine that this yarn would suit those sort of stitches extremely well, all those different colours layering on top of each other and peeping out from behind another yarn, just the thought reminds me of those wax crayon scratch pictures I used to make at Primary school….

I also tried ripping back every-so often to see how the yarn would behave, and even after the fifth rip back of the same piece of knitting, the stitches still looked fine (I can still count on one hand the amount of finished knits that haven’t had at least a few rows of re-knitting so I always like to know a yarn can cope with mistakes and errors…)

I must admit to squish squish squishing those rows of garter stitch more than was probably good for them, there’s a nice amount of depth to the stitches without the knitting feeling bulky.

blocked stitches

After the swatch was finished, I gave it a little bath and pinned it out to set, it dried really quickly and kept the shape very well….over the course of testing I washed and blocked the swatch 3 times and it still looked as good as new the third time….over the course of the week the swatch was pinned under clothes, tucked under a bra strap, and shoved into a pocket….there was no itchy or playful tickle just soft silky kisses.

The stitch definiton is excellent, it’s probably easier to see on the stocking stitch and garter stitch rather than the texture stitches, however, the areas where there is a lot of texture look incredible because you have all this colour going on and then there is a wonderful silky lustre overtop so the knitting almost glows… there’s a very very slight halo above the stitches, I wasn’t aware of it until the 3rd wash and then it’s still only barely there, a bit like ground mist on September mornings.

colourful stitches

As I mentioned earlier I really like knitting shawls so tend to think of a yarn as “how would it knit for those”, but as my knitting improves and I feel more confident, I’m starting to daydream a lot about knitted vests, not a what I call a tank top, but proper next to the skin vests….vintage knitting books often have patterns for them and whereas in the past I’ve laughed and thought “oh no”…after knitting with this I’m very much thinking “oh yes”….it feels very comfortable next to the skin and I think it would feel the other side of fanciness and luxury to wear a chamisole top or Spencer knitted in this….

pumice rubbing

Now I’ve heard some stories about Sonja from Blacker Yarns at The Edinburgh Yarn Festival, how she tested one of their yarns with a piece of pumice stone to show how it wears and I thought to try that out here…..I’m so sorry Joy and the fine folk at John Arbon, please don’t think I would normally treat my knitting in such a way, but I wanted to see just how mean I could be, (also I know some other people testing this were going to try it as socks….I did check with Joy and she said this wasn’t intended to be a sock yarn as there is a lack of wooliness but to go ahead and test how I like)…..

I broke some pumice so the edge was pretty rough and then swiped and rubbed for about a minute…I didn’t just do it in one direction but back and forth, left and right and diagonally…..to be honest I thought I was going to rub right through but the fibres (possibly the silk) lifted, fluffed up, and after wetting there was a little felting…Personally I’m not sure I would use this for socks as I prefer them to be woolier, but on the other hand, I’m not sure how well some of my ‘sock yarn’ yarns would behave if I treated them the same…..I know lovely Maylin is testing some, she’s been knitting herself some toe caps so please keep an eye on her most awesome blog for her full report……however if you wanted to knit a pair of fancy shmancy bed socks then I can’t think of anything more luxurious to slip your toes into than this.

rainbow hue

Overall I think this is a really wonderful feeling yarn, it’s gentle against the skin and has a lovely flopsadoodle drape which for me would mean it’s ideal for a shawl, the skeins are 100g with a length of approx 400 meters… so that is enough for quite a nice sized shawl….it’s retailing at £19.50 a skein so won’t break the bank either.

Britsilk was released this weekend at Fibre East and will be available from Thursday on The Knitting Goddess website (you might want to just check with her instagram to see what time it will go on sale) it’s been dyed in multi-colours like this swatch but also in semi solids (ohhh you should see the Coal and Black colourways…perfect for ohh lah lah lingerie) and then the next batch of yarn will be in December, which right now seems a long way away but I’m thinking, once you’ve done all your present shopping then a skein or two of this as a treat for yourself might be more than a little bit nice.

lace detail

Many many thank yous to Joy for the opportunity to have a little play with this gorgeous and breathtakingly beautiful yarn, it really has been a pleasure to knit with.


A high summer jam with a couple of variations……..

raspberry harvest

Apart from the odd overcast afternoon with an accompanying shower of rain, it’s been pretty dry here the past few weeks in Norfolk, and while it’s a bit too warm for me to want to spend too long outside in the garden, our raspberries are loving the early heat wave.  Many of the plants are already my height and more and we’ve been picking fruit everyday, in fact there is now so much all ripened together that today I’ll be making jam.

The variety of raspberry we grow is called Autumn Bliss, the plants produce two harvests, a small early crop around now and then they really go for it around August and will produce fruit, weather permitting, through October and even into November if there isn’t a frost.  Those first fruits are smaller in size but come August they are the size of small plums, but already we are seeing very impressive sized red velvety berries, hanging down from the bushes like Christmas tree baubles….Normally we don’t get jam quantity sized gluts until the second harvest, so this is a lovely surprise, especially as today seems a bit cooler and I won’t need to keep fanning myself while I’m leaning over the jam pan.

a handful of berries

The other Christmas my boyfriend bought me a huge French copper jam pan, and that’s really wonderful for making a kilo of fruit sized jam quantity, (the jam itself also seems to look brighter and more glossy) but I’ve also regularly used the big size Le Crueset or Chausseur pans if I’ve only had say 500 g of fruit (though if you have room in a freezer, you can always freeze small quantities of the berries until you have enough as raspberries freeze very well)

Raspberry Jam

Ingredients

1 kilo of freshly picked raspberries

800 g granulated sugar (I use golden as it has a lovely taste)

juice of a lemon

Some sterilized jam jars

(pop a couple of little saucers in the freezer as these will help checking the set of the jam easier)

Method

Don’t wash the raspberries, just check them over and cut off any bits that are a bit scabby.  Put them into the pan you’re using for jam. Cover with the sugar and the lemon juice.  Bring the fruit to a gradual boil, all the time just very gently stirring the fruit and the sugar together without over squashing the raspberries.

Keep stirring gently, and allow the fruit and sugar to bubble furiously….as well as watching the jam, you’ll need to keep an eye on the time.  The jam needs between 5-8 minutes (a bit longer if you are using more fruit), skim if it’s needed (though to be honest I don’t always bother), check for a set on a chilled saucer from the freezer, allow the jam to cool down for a minute (turn the jam pan off so it doesn’t keep cooking)…once the jam wrinkles when you push your finger into it, pour into the sterilized jars and cover with waxed discs.

Variations

Sometimes I add a splosh of cognac to the jam once it has reached setting point, it adds another note to the jam which is particularly nice if you’re using berries from the freezer….another little tip which I do more with the Autumn crop and which ekes out a smaller quantity of raspberries is to mix them with nectarines and peaches, this is especially good if you’ve bought some of those and they are a bit sort of ….woolly…. (I don’t like to say woolly as a non compliment as I love my sheepy yarns and a really woolly yarn is always lovely to knit with, but I can’t think of how else to describe peaches and nectarines when they become a bit spongy and fluffy tasting at the end of their season)…

I generally use around a 5 to 4 fruit:sugar ratio…… so 250 g of peaches will need 200 g of sugar…..Peel the peaches, remove the stones and weigh.  Put into a ceramic dish and add the calculated amount of sugar and a squirt of lemon juice, leave for a couple of hours and then mash slightly…if you are just using a couple of peaches then a tablespoon or so lemon juice will be enough as you’ll be adding more with the raspberries….put into a heavy based pan and bring to a simmer for a couple of minutes….once the fruit has softened, add to a jam pan before putting the raspberries and rest of the sugar and lemon juice……

That all  sounds a bit pfaffy but it’s actually very easy and it uses up fruit which otherwise isn’t quite so nice to eat.

Raspberry jam is such a taste of Summer jam and can’t be beat on scones mere seconds out of the oven, ones so warm they can just be pulled apart before being covered with jam and a smear or dollop of clotted cream, it’s also excellent for a Victoria sponge cake. But I’ve also used the raspberry jam before in making truffles, the sharp fruity taste mixes in perfectly with the chocolatey ganache.


Plum jam from the 50p box

jam and bread...

One of our favourite stalls on Norwich Market is Folland Organics owned by our lovely friend Robb, by the side of his counter he has a 50p box where he puts fruit and vegetables that need to be sold quickly and so sometimes supper can be decided because there’s a bag of wrinkley carrots needing a home, or a load of spinach that is starting to wilt….yesterday I had a text from my boyfriend “Robb has cheap plums, shall I buy some” and while it’s too warm for crumbles or a plum pie, it’s never too warm for jam, well sometimes it feels too warm to be standing over a bubbling jam pan making it but the end result always tastes nice….

I love making jams and jellies, marmalades and chutneys…there’s something very satisfying about preserving a couple of handfuls of fruit in sugar, and knowing our pantry/cupboard shelves has a few jars of homemade preserves on them means I’ve always got a quick last minute present or am at least part way to making an afternoon tea or pudding.

mirabelle plums

The  past couple of years I’ve been making more fruit jellies than jams, using ingredients from what I think of as my wild larder.. plums and cherrys, rose hips, haws, rowan berries, crab apples and wildlings, and as much as I like the slow cooking of the fruit and the steady drip drip drip of the jelly bag (I call it a jelly bag but I use an old pillowcase as that’s more sturdy than the jelly bags I’ve seen for sale in the shops, and then tie it under an open step ladder…not pretty but it’s sturdy) but the jams I like to make the most tend to be what I think of as French style, soft set jams, where the taste of the fruit is clean and sharp, not over sugared or bubbled away for ages…jams you can spread out on wisps of buttery puff pastry and top with chatilly cream for an instant pudding but which are just as nice smeared on  crisp hot toast or still warm from the oven scones.

As there is such an abundance in the hedgerows around where we live, I tend to make most of our jams and jellies with wild fruit rather than spending a lot of money on shop bought ones, I’d normally make this plum jam with the mirabelles that grow just up the road, but the 50p plums have worked really well…..I also tend to think of plum jam as a winter jam as I’d normally pop in some star anise, a couple of cloves and a piece of cinnamon….

macerate plums in lemon juice and sugar

Plum jam

ingredients

750g plums

560g granulated sugar

Juice of 1 1/2 lemons

1 star anise ‘star’ (force of habit and not really sure it was needed)

method

Quickly rinse the plums in cold water , wipe them over and pat dry clean.  Cut in half, place in a ceramic bowl, squeeze over the lemon juice and then tip over the sugar…..

Allow the fruit to macerate in the sugar and lemon for a couple of hours.

Tumble the fruit, juice and syrupy sugar into your jam pan and bring to a simmer. Remove the fruit and put into a ceramic bowl, pour the syrup on top, cover with a circle of baking parchment cut to fit the top of the bowl, allow to cool and then leave overnight in the fridge.

simmered plums in syrup

Next morning, place a sieve over a large ceramic bowl and carefully place in the fruit, pour over the syrup (a rubber spatula really helps at this stage)…cover everything with cheesecloth to keep any flies or wasps off and leave until the syrup has collected into the bowl below.

Pour the syrup into a jam pan, and slowly bring to a boil, once the syrup is boiling bring up the heat and continue cooking. You want the syrup to concentrate and by the time it’s reached 105c on a jam thermometer it will be ready.

making plum jam

Carefully add the plums, bring back to a boil and carefully cook for 5 minutes stirring gently.  At this point the plums become the deepest red, all vampirey and theatre seat velvet….Skim the surface to remove any fruit scum.  Check the set. (I pop a couple of little saucers in the freezer as this makes checking the set easier.) Pour the jam into sterilized jars and seal immediately with waxed papers and once it’s cooled right down, cover with cellophane discs and rubber bands.

I’m happy to leave the stones in (never too old to play tinker, tailor….) though when you label your jars you might want to mention to keep an eye out for them…you don’t want to forget and later crack a tooth…..

We had this today for breakfast (him with toast, me with yoghurt) it was so fresh and fruity, and without the extra spices isn’t a Winter tasting jam in the slightest…..

I’m really lucky as I have a big copper jam pan from France but I also use a stainless steel pan for smaller quantities which you can get from Lakeland plastic…I’ve also made very nice jam in Le Creuset/ Chasseur pans, the 30 cm or so size one is good as you need the height for the jam to bubble up and rise….


Broad beans, exotic blooms and the blackbird tapping……

white bottomed buzzy bee

For the past some years I’ve been an early riser, even on those dark cold mornings when it’s rainy and windy outside, I could happily snuggle back under the pile of quilts and blankets that we have on the bed, but once I’m awake, I’m awake….I need to be up, have the kettle on, make a pot of tea…  Even if it’s just nestling in my corner of the sofa with some knitting, my day has began and I want to start doing…..

Come Summer the early morning light creeps into our bedroom, I can hear the dawn chorus begin and feel Bernard shift around at the bottom of the bed, I make myself stay under the covers til five thirty so I don’t wake the whole house with my fidgetting but then I’m up and try to be mouse quiet as I dress and creep down the stairs…

The past week has seen the weather warm up, mornings have a soft cool breeze that tickles at the back of my neck and along my arms, but make being outside a pleasure in the early hours before it feels too hot and scorchy….

napping on the potting table

(the supervisor taking a little nap sometime last year……)

Our little back garden is quite open, it’s East facing so there’s plenty of sunlight for plants, without the full exposure of West facing, there’s shady spots and shadows shift across the vegetable beds….

The past couple of Summers gardening hasn’t been so easy, or so enjoyable, next doors cats seem to delight in playing amongst our raised beds and raspberries, last year we didn’t feel inclined to do anything after numerous plantings were squashed, dug up, and pooped on….but this year I can feel the pull of the soil in my heart, I need to get my hands in the compost and plant, smell green things growing…..

The last time I felt this deep longing was a year or so after my dad died, there were so many things I wanted to ask, some to do with how things were planted, what was the best time for beans to go in the ground, how much space should I give courgettes and squashes, how many tomatoes could I fit into a grow bag….but also other things too…conversations I didn’t know I wanted until it was too late…..being outside, potting things up, weeding and tickling with one of my dad’s hoes (there’s a spot his hands have worn right smooth and shiny) seeing what wanted to grow where and what liked the soil…..all the noise and jumble in my head seemed to soothe itself out while I dug, and planted, watched seeds I planted grow into sweet smelling blossoms, herbs and fruit I was able to make into pestos and jam…….

It’s not been all sunshine, we’re still getting quite heavy downpours so being out first thing in the morning, the soil feels damp and weeds are relatively easy to lift out before Summer makes everywhere rock hard….but it’s being outside while the morning wakes up alongside with me that is seeming to give me the most pleasure….

We’ve been buying live meals worms from Wiggly wigglers and the blackbirds and robin have been tucking in like you wouldn’t believe….the sound of the blackbird tap tap tapping as he fills up on worms accompanies me most mornings when I’m outside and if I’m weeding, the robin hops over and watches me, cocking his head from side to side then darting down if he thinks I’ve found something particularly interesting….

broad bean flowers

I’ve cheated a bit this year, rather than grow a lot of things from seed I’ve bought small plug plants from Thorns which is a local ironmongers, if you live in Norwich or Norfolk then you’ll be smiling when I say it’s a right old rabbit warren inside, and I’m sure people get lost in there all the time…..I’ve planted out two rows of peas and I’ve also got broad bean plants growing too….I love the stark contrast between the milk white and inky black blossoms, and look forward to seeing those tiny doll sized pods appear…we’re growing the broad beans a bit different this year, himself has read about growing them in a circle with a tripod support, the beans grow closer together and create a micro climate that retains the moisture in the soil…..I’m not sure what my dad would have thought, he grew his in rows but then he’d grow several hundred where as we have just 2 dozen.

newspaper pots

Apart from the plug plants, I’ve planted some french beans from bean rather than plantling, the first couple of weeks of May were really cold and damp so I don’t think it’s the end of the world planting these now, hopefully they’ll soon start to sprout and come on before I know it….

I’d wanted to try make these newspaper pots for ages and I found a couple of really nice little videos on youtube, (I think this chap in particular is really nice)….I actually got a bit carried away and made way more than I needed so I think I might plant up some of the wild/apline strawberries that have started to take over under our cherry tree and give those away to friends….

Other seeds I’ve planted included foxgloves and hollyhocks and some grannys bonnet that I found up in a seed box, I don’t know if the grannys bonnet seeds will grow as they are a few years old, they came from a plant that my dear friend Joyce gave me, she died last year so I must have had these for a good few years…oh well, we’ll see, if they grow they grow, if not…I’ll just have to buy one instead…the hollyhocks are from various neighbours gardens, I’m not sure if these are the deep purpley, as “black as Cromwells heart” (…thank you @paulbommer for that) ones or the apple blossom pink ones that are all faded brown around the edges…..for the most part we have lovely neighbours, and a compliment on gorgeous front garden blooms sees a handfull of seeds given away very generously……

courgette flower

One of the real delights in getting up nice and early is being greeted by a beauty like this when you step outside….it’s like a glorious exotic bloom in a glasshouse….seriously who needs Chelsea Flower show when this is in the back garden…The blossom is the most eggy colour yellow you could imagine, all sou’westery and brightness itself….

I love courgettes and I bought 3 plants from good old Thorns, Mister Green Fingers informed me last night that I’d planted them a bit too close together so first thing this morning I moved two of them, I’ve put them into large plastic pots and will try and remember to buy some plant food when I go into town on Friday (another visit to Thorns, I almost live there in the Summer….) I can happily eat courgettes til they come out of my ears, grilled, roast, lightly steamed and served on cauliflower rice or tossed into a salad…I used to use them in a poppy seed cake where they add lots of moisture, so the cake in theory would keep longer though it tasted so nice it wouldn’t ever last more than a couple of days.

wild strawberries

I mentioned the wild/alpine strawberries that have taken over the garden somewhat…..we’ve grown both wild and alpine varieties and over the years they’ve pollinated each other so the fruits that grow in the back garden are rather a jumble, they seem to do most well just growing where they will rather than in pots, often the sweetest fruit are the ones that appear in the middle of the patio or alongside our garden path…I guess it’s because their roots like to spread out, and for the most part we just let them do as they please….the little fruits are a mix of sweet and sharp, some taste like Opal fruits/starburst, others are tart and make you go “ooh!!”….I’ll often add them to jam (they are too tiny to pick enough to make a jam of them by themselves) or to breakfast yoghurt, we also like to mash them with water mint from over the marshes and make a Summery Orchard Mist cocktail….


A birthday blankie for Bernard with some bobbled corners…..

bobble pom poms

Over the past six weeks I’ve been taking part in Hanna’s #lentenwipdown…… something I find I do time and time and time again is to start something new when I already have a pile of half finished (or sometimes just barely started) projects that really deserve my attention a whole lot more….I don’t know why I do it, it’s not like I don’t love those half made pieces but I think it’s more a case of just wanting to try everything…..we don’t have a very large house although I’m lucky enough to have a room for all my sewing and fabric and yarn hoarding, but I’d much rather this room was free of all the half mades and just starteds, so the “wip-down” has been a good boot up the bottom to get me tackling some of those very slow wip’s…..

more nine square patches

After going through various half made items to assess how much really needed doing to each one before it was finished I decided to tackle this crochet blanket….and a couple of reasons were behind my thinking…..since using tapestry yarn for my crochet blankets I’ve tended to avoid using acrylic yarn, I don’t like the way it squeaks, it makes me feel all “stat-icky” with electricity (my hair always gets a bit bird nesty when I’ve been using it), and I’ve found it makes my hands ache more than when I crochet with wool yarn….in a corner of my work room I had a couple of big bags of brightly coloured acrylic yarn and a lady on the bus had told me that her grand-daughter used this to make blankets for various charities, so I thought if I finished joining in the little squares for the blanket then I could not only have a finished wip I’d also be able to get rid of those bags of yarn that I wasn’t really planning to use again…..

crocheting-along

Joining in the little squares actually didn’t seem to take that long to do at all, I love chosing the random colours and like to mix up rather odd colour combinations, it’s always been the main appeal of crochet for me, using up small pieces of brightly hued yarn to create multiple coloured squares……

Actually I’m trying to remember exactly when I started this blanket, orignally I made my two youngest nieces a couple of crochet blankets when baby Eliza was born (she was 4 in November so that’s a few years ago now) and I had lots of squares left over, I then used some of those to make a lap blanket for my friend Joyce and as is my way, made even more little squares for fear of not having enough so again I had some left over…….they ended up being shoved into the back of a cupboard where they were forgotten about……when I found them again at the start of 2015 I decided to rip out the third and fourth rounds, and join them together on the third round.  (The fourth round had been white and I’d wanted a more intense spread of colour rather than pops of colour in a sea of white)…..

making a new blanket

I stuck with it for a good while but somewhere along the way I got bored again and bundled it all back into the cupboard…..

layingtwo strips together

When I was making the blanket I’d found it easier to concentrate on crocheting lots of little squares then joining them into nines (rows of 3 x 3) and then joining those nines together (in rows of 7 by 7)…by the time I’d gotten bored there were a whole lot of big 7 x 7 square pieces which doubled up as small window blankets for Bernard to sprawl out on (he loves laying in the window and prefers to have something underneath him…for a cat that was originally found in a dustbin* he is very high maintenance)

sewing in the last dozen or so tails

But it’s always sewing in those yarny tails that are my downfall…..good intentions to sew them in as I go seem to fall by the wayside very rapidly, and while I know there is a technique where you crochet them in as you go, whenever I’ve tried to do that I ended up with fat old lumpy sides….

upside down

Anyway, a certain furry someone is always interested when a crochet blanket is being made, put it down for 5 minutes to go make a pot of tea and you’ll find it “just being kept warm” on your return…..

Because he loves blankets we decided that this would be a birthday present for him as he clambered up onto it every evening, and mewed if it was elsewhere, even needing to be carried upstairs on a royal cushion of crochet blanket come bedtime…(yes, he is one very spoilt cat).

rainbow tails

I really tried to keep on top of yarny tails while I was joining in the squares and as a nice incentive and way to keep track of tail sewing in progress I began saving all the tails in a bowl we normally have filled with Quality street at Christmas…and slowly the tails began to pile up……

I love seeing this mix of colours, combinations of colours that might seem a bit Hmmm in fact look great together, a bit bright and circussy perhaps, but this jumble of colour never fails to make me smile…..

crocheting over where two squares join

And finally…the day came when the last yarny tail was all sewn in…the blanket while an okay size wasn’t over huge or anything so I decided to add a few rows of single colour border, first white then pink and then red…….

I probably would have left it at that but then remembered the wonderful blanket I’d seen in the window of Norfolk Yarn the other week….. so I decided to make some of my own fat and squidgy pompom like baubles…..I didn’t make them as dangly as I thought they wouldn’t last 5 minutes if himself was feeling mischievous, so attached them right up to the edge of the blanket…and filled them with some red fleece I’d bought ages and ages ago….

I’m sure if you have a cat you know what happened next….he’s chosen to pretty much ignore it…that’s been a few hard whacks with a paw of the baubles but for the most part he’s walked past it, nose in the air……no doubt when the fuss of a new blanket has died down we’ll find him all curled up asleep on it……

If you want to make your own baubles this is how I made mine….

pom pom bobble detail

Baubles for a blanket (UK terminology)

dk weight yarn, 3.75 mm hook (I like my crochet quite tight)

Round 1….Make a magic loop and then work 6 double crochet stitches into it, you’ll end up with 6 stitches, carefully pull your magic loop closed and finish the row off with a slip stitch…

Round 2….Work 2 double crochet stitches into each of the previous stitches, finish with a slip stitch, you’ll have 12 stitches….

Round 3….Work 2 double crochet stitches into the next stitch, 1 double crochet stitch into the next one….repeat this pattern all the way around, so you have 18 stitches, finish with a slip stitch.

Round 4….Work a double crochet stitch into each of the previous stitches, you’ll still have 18 stitches…finish with a slip stitch.

Rounds 5 and 6….Repeat as for round 4.

Round 7….Work a double crochet decrease, then make 1 double crochet stitch, repeat around 6 times, finish with a slip stitch, this will reduce your stitch count down to 12.

At this point stuff the bauble firmly, try to use the same colour stuffing as the yarn you’ve used….

Round 8….Work a double crochet stitch decrease all the way around so you end with 6 stitches, finish with a slip stitch.

Fasten off leaving a long enough tail to attach the bauble to your blanket corner.


It feels really nice to have at least one less work in progress in the cupboard of doom, and the last few weeks while finishing this has made me think about other pieces in limbo that have been shoved away, what do I really want to finish, what can be charity shopped etc and what can be worked on next……..

*Bernard was a stray cat that was found eating food from a big catering bin at the back of a row of takeaway shops…he wasn’t skinny but his diet wasn’t really very good….nor did he have shawls that have taken me weeks to knit to sleep on…..